Low-waste Leaf Stamp Holiday Cards and Gift-wrap
- GrowNYC Education
- Dec 7, 2020
- 5 min read
Updated: Apr 6, 2021
As happy as the holidays are, I always feel a little bittersweet about them because I often notice a ton of waste! From wrapping paper, to holiday cards, decorations, and ribbons, it seems like so many things you buy just to have them thrown away (or recycled) weeks later. Did you know, a lot of wrapping paper isn't even recycle-able! Earth911 estimates that 2.3 million pounds of wrapping paper end up in Landfills each year, and that is just in the U.S. (source)! This terrifies me and therefore every year I try to come up with a semi-waste free way to wrap the gifts I give. I have wrapped things in newspaper, re-used gift bags, and even carefully peeled apart gifts to save wrapping paper and use it again. This year I had a little more spare time (THANKS CORONA) and I decided to craft my own version of wrapping paper. I've always wanted to make holiday stamps but I didn't want to buy a printing block or all the materials needed to carve one out, especially since I am not the best artist and I would likely only be using these materials once. Instead I decided to try to make DIY stamps! I love to gather inspiration from nature (and am not the best at free-hand) so I collected leaves to trace for this craft. Here is the finished product wrapping paper with a gift card. Below you will find a tutorial to make your own!

This project is incredibly adaptable, if you don't have some of these materials, check your trash and recycling before running to the store to pick something up. You can make your own nature design, or even take inspiration from holiday cards you might have bought. I am a grown adult crafting here (cause that's my business) but this project is great for kids too!
Materials
For this project you will need...

Leaves (optional) I recommend leaves because they are beautiful, readily available on the ground outside, compostable, and technically its still fall so I can still do fall crafts!
Paint of varying colors, you could also use an ink pad here if you have one.
A glue gun or craft glue.
Scissors.
A pencil or pen (I used one of each).
Leftover cardboard or a similar material you have around (like scrap wood).
Foam paper or a similar material you have around (I couldn't think of an alternative here but let me know if you have an idea!).
Wrapping paper - I reused packing paper that came in a package I had ordered online. You can use a big roll of paper or even a cut up paper bag. The trick here is you want the paper to be relatively thin so its easier to wrap with.
Card stock or thicker paper for the gift cards - I used a page of a sketch book I have.
Again, look around your house and get creative before buying something! The only thing I needed to buy for this project was the foam paper and paint - neither of which I had or could think of an alternative for. I also love to craft so I will make sure to re-use these products in the future instead of just for this one craft.
Lets get started!
First you are going to trace your leaves on to the foam paper. Then you are going to cut out your leaf shapes. Next, you are going to cut pieces of your cardboard (or something similar) big enough for the foam leaves to fit. You will glue down the foam pieces to the cardboard and wait for them to dry. I was able to do this all in a few moments with a hot-glue gun, but if you are using craft glue you may have to wait longer for things to dry before moving on. Then you will use smaller pieces of cardboard to create a handle on the back of the stamp. I used a little bit of folded cardboard but you could use a bottle cap, or something else you have around. Check out these images below for reference.
After all of those steps you will have your finished stamps! I hope to use these again for crafting in the future so I will definitely be saving my stamps.

You can see here I made some stamps as one leaf and I arranged a few leaves on one stamp to make a whole gift card. There are two ways to make these gift cards which I will explain in more detail below. Use your creativity here! You can make your stamps look however you want :)
Now you will start to create your stamped image!
You can click through the pictures below to see how I made the "one-off" gift card. This is the first option you have for making cards and is ideal if you want them all to look identical or don't have too many cards to make. I started by painting on to my stamp (this would be a great place for an ink pad if you have one). Next I pressed my stamp onto my pre-cut paper. In the third photo you can see that the press wasn't perfect. No fret! Its easy to touch these up with a dot of paint (fourth picture). This card is not completely done yet, for now set it aside to dry fully.
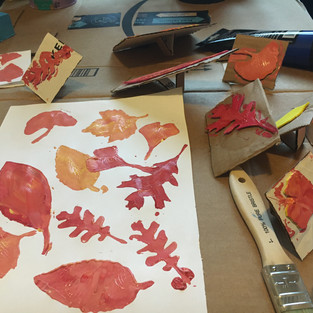
You can see in the photos below how I made the "bulk" gift cards. This is a great option if you need to make a ton of cards. I started with a bigger piece of paper and I pressed my leaf stamps all over it. It's important to re-up on the paint between each stamp press, otherwise you wont get the full leaf print... unless thats the rustic look you are going for! You can try this out yourself and see what works best for you.
Next, I set this aside to dry completely.
For the wrapping paper, I chose my favorite leaf and pressed it on the wrapping paper over and over to create a block-like pattern. You can also use multiple stamps to make your wrapping paper, I just liked the more geometric look here. After letting my prints dry fully, I then outlined each leaf with black pen to give it some more definition. I finished off by creating some veins on the leaves for texture. Feel free to add as much or as little detail here as you like. This is definitely a little messier looking wrapping paper than something you might buy at the store, but it has a personal touch and for something people are most likely going to recycle anyway... who even cares!?
After letting the gift cards dry fully, I did the same outline-ing and detailing on them. With the "bulk" card I also cut out smaller shapes from my big piece of paper. I liked how each one was unique and some of the leaves were cut off.
Don't just stop at leaf stamps! You can create any pattern, design, or simple image with this method. You can also use scrap wood to create more permanent stamps. Although I hope to reuse my leaf stamps, I know I will get much more use out of this smiley stamp so I created that one on something more sturdy so it will last me a little longer.

This whole project was so fun and I cant wait to give my gifts in these super personalized, unique, lower-waste way! If you do this project make sure to send us an email of your creation at ebrown@grownyc.org, we would love to show off all of your wonderful designs.


