Natural Dyes: Play with Pigments
- GrowNYC Education
- May 6, 2020
- 4 min read
Updated: Apr 13, 2021
Watercolors, Facepaint, Tie-Dye, and More!

Have you ever cooked with beets to find that your fingertips and cutting board are stained a vibrant red? Or maybe your favorite white coffee mug has a brown tint to the inside? If so, you’ve already experienced a plant pigment! There are some simple but magical techniques you can use to harness the brilliant colors found in plants - including the very ones found in your fridge. These pigments are easy to source, a ton of fun to experiment with, and a great way to use up some less-than-fresh produce. They are also an excellent alternative to harsh chemical dyes.

Materials
- Richly-pigmented food like: beet skins (pink), avocado peels and pits (pale pink), onion skins (yellow-orange), purple cabbage leaves (purple-blue), spinach (green), black beans (blue, believe it or not!), turmeric (golden yellow)
- Saucepan
- Strainer or slotted spoon
Directions
1. Gather your pigmented ingredients. You’ll want at least one chopped cup of each item to create a deeply-saturated dye.
2. Add the chopped ingredients to a saucepan, and cover with twice as much water as the fruit or vegetable. Place over medium heat, and simmer for one hour. You can have multiple pots simmering at the same time.
3. Keep in mind: if you plan to dye fabric, you’ll want to make sure you have enough dye for the fabric item to float freely while it picks up color. When in doubt, make more dye than you think you need (which means you’ll need to use more fruits and vegetables). You can also increase vibrancy of the dye for clothing by adding a Tablespoon of salt.
4. Turn off the heat to bring the mixture to room temperature.
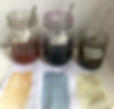
5. Strain the cooled dyes into glass containers. Don’t forget to compost your fruit and vegetable pieces!
Make Watercolor Paint
Simply use your strained dyes as watercolor paints! You may need to layer the colors to get a richer hue on paper. Note: Coffee filters that are folded in half can be a good stand-in for watercolor paper, if you don’t have any at home. Feel free to get creative with your canvas: the backs of envelopes, white paper pastry bags, or even cardboard boxes could all use a little color.
Tie-Dye Natural Fabrics
Step One: Choose any natural fabric, such as silk, cotton, hemp, or linen. Check the house for spare tee shirts, cotton grocery bags, sheets, towels, pillowcases, table cloths, dish towels, etc.
Step Two: Make a mordant to help the dye stick to your fabric. Add 1 cup of white vinegar to warm water, and soak items for 1 hour before dying.
Step Three: After simmering the food scraps in water for 1 hour, strain out solids and put dyes into a container that will hold your fabrics fully submerged.
Step Four: Fold and tie the fabric to create different patterns using rubber bands, string, or floss to hold the folds in place. Find some folding techniques here. Then, add your fabrics to the containers of dye.
Step Five: Let fabric soak a few hours or overnight (until they are a bit darker than you’d like them to be), checking occasionally to flip the fabric and to make sure it remains fully submerged in the dye.
Step Six: Remove fabrics from the dye and rinse under cold water until it runs clear. Unwrap rubber bands or strings and rinse again until clear. Hang the fabric out to dry, and wash separately on cold during first laundering.

Make Dyed Eggs

Step One: Proceed with step 1 from page 1, but only simmer your food items in water for 10 minutes instead of an hour.
Step Two: After 10 minutes, strain, and pour the dye into glass jars or bowls. Add a tablespoon of white vinegar to each dye for every two cups of water you added to each saucepan, and let the mixture come to room temperature.
Step Three: Prepare hard boiled eggs for dyeing.
Step Four: Use tongs to place the eggs in the dyes. Feel free to mix and match here, or use accessories like strings wrapped around the eggs to create unique designs.
Step Five: Leave the eggs in the dye for up to two hours (or overnight in the refrigerator), then remove with tongs. Leave on a paper towel to dry.
Make Homemade Face Paint
Step One: Make the base by mixing equal parts of corn starch and face lotion. Add a few drops of vegetable oil to keep the paint from caking.
Step Two: Put a portion of the base into a small container and add a few drops at a time of your homemade dye (or natural food coloring or washable paint).
Step Three: Repeat step two for as many colors as you’d like.
Step Four: Apply using makeup brushes or sponges. Be careful - the natural dye can stain, so you may want to test a small area of skin for adverse reaction before applying to a larger area.